

Seam allowance is the strip of fabric between the raw edge and the stitch line, and it’s what holds a garment together without falling apart at the seams. Most US commercial patterns default to 5/8 inch (about 1.5 to 1.6 centimeters), though the right size shifts depending on the project you’re working on.
Here’s why the number matters more than beginners assume. A seam allowance error of a small amount on each seam of a multi-seam garment can shift the total fit by several inches once you add up every seam around the body. Sew six seams a hair too narrow and a fitted jacket suddenly gapes at the chest. Sew them too wide and you can’t raise your arms.
A few starting facts worth pinning to your machine:
- Quilters use a scant 1/4 inch for piecing accuracy.
- Garment sewists lean on 5/8 inch because it leaves room to alter fit later.
- Anything narrower than 1/4 inch risks fraying and popped seams under stress.
Key Takeaways
Getting seam allowance right comes down to picking a size that fits the project, marking and cutting it accurately, and sewing it with steady, repeatable technique rather than chasing an exact number every time.
| Point | Details |
|---|---|
| Default to 5/8 inch for garments | US commercial patterns generally build in this allowance; confirm before cutting. |
| Use a scant 1/4 inch for quilting | This compensates for fabric consumed during pressing so blocks stay accurate. |
| Check for “net” patterns | Many European and indie patterns exclude seam allowance, so you must add it yourself. |
| Consistency beats precision | A steady, repeatable allowance produces better results than one perfect measurement. |
| Grade and clip for flat seams | Stagger trim widths on layered seams and clip concave curves so seams lie flat. |
Table of Contents
- What Is Seam Allowance and Which Size Should You Use?
- How Do You Measure and Mark Seam Allowance on Fabric?
- How Do You Sew a Consistent Seam Allowance Every Time?
- What Do You Do With Seam Allowance After Sewing?
- Which Seam Allowance Fits Your Project?
- The Atelier View: Why Fora Leonara Treats Seam Allowance as a Fitting Tool
- Common Seam Allowance Mistakes and How to Fix Them
- Sources
- FAQ
What Is Seam Allowance and Which Size Should You Use?
The seam allowance definition sounds simple: it’s the margin of fabric you sew through, not the finished edge you see. But which size to pick depends entirely on what you’re making, and the range is wider than most beginners expect.
Here’s how the standard sizes break down by project:
- 1/4 inch (6 mm): Quilting piecework, where precision across dozens of blocks matters more than sturdiness.
- 3/8 inch (1 cm): Lightweight garments and delicate seams where less bulk helps the fabric drape.
- 1/2 inch (1.3 cm): Some knit patterns and children’s clothing, balancing ease of sewing with reduced bulk.
- 5/8 inch (1.5 to 1.6 cm): The standard for US home-sewing patterns, wide enough for alterations and easier handling.
- 1 inch or more: Tailoring, muslins, and hems, where you need room to let a garment out or take it in.
European and Japanese patterns often work differently. Many indie and European patterns are drafted as “net” patterns, meaning the seam allowance isn’t included at all, and you add it yourself before cutting. That’s a real trap for anyone used to US patterns that build the allowance in. Skip that step on a net pattern and your finished garment comes out smaller by the allowance amount on every single edge.
The trade-off is straightforward once you see it laid out. Narrower allowances mean less bulk and cleaner curves, but almost no room to fix a fitting mistake. Wider allowances protect you during construction and let you grade a garment up or down later, at the cost of extra fabric to trim away and press flat.
How Do You Measure and Mark Seam Allowance on Fabric?
Before you cut a single piece, confirm whether your pattern already includes seam allowance or expects you to add it. This single check prevents more sizing disasters than any other step in the process.
- Read the pattern envelope or instructions. Most commercial US patterns state seam allowance is included, usually at 5/8 inch. European and many independent PDF patterns often say “seam allowance not included,” which means you’re adding it yourself.
- Choose your measuring tool. A seam gauge (a small sliding ruler) works for straight edges. A clear seam allowance ruler with printed guide lines speeds up marking on curves. Some sewists cut a cardstock strip to the exact allowance width and trace along it as a template.
- Mark with dots, not one continuous line, on curves. Place dots closer together around tight curves like armholes or necklines, then connect them by hand for a smooth line that won’t distort when you cut.
- Transfer notches and match points after any allowance change. If you add or adjust seam allowance, move your notches accordingly, since they exist to align pieces correctly at the stitch line, not the cut edge.
- Cut a test piece before committing your good fabric. A scrap swatch tells you whether your marked allowance actually measures what you think it does once it’s under the presser foot.
Pro Tip: Keep a small cardstock template cut to your most-used allowance (5/8 inch for garments, 1/4 inch for quilting) in your sewing box. Tracing along a rigid edge is faster and more consistent than eyeballing a ruler every time.
How Do You Sew a Consistent Seam Allowance Every Time?
Consistency, not perfect measurement, is what actually produces professional-looking seams. A seam that’s steadily 1/2 inch beats one that wanders between 3/8 and 5/8 inch on the same line, even though neither hits the “correct” number exactly.
Most machines have seam allowance markings etched right onto the throat plate. Keeping the fabric’s raw edge aligned to the 5/8 inch line, for example, gives you a built-in guide with zero setup. If your machine doesn’t have markings, a strip of painter’s tape placed at the exact distance from the needle does the same job, and it’s easier to see out of the corner of your eye than a printed line. Magnetic seam guides clamp onto the machine bed and offer a raised edge to butt fabric against, which some sewists find more tactile than tape.
A few habits worth building:
- Sew a few scrap strips before starting your project, then measure the result with a ruler and adjust your guide if it’s off.
- Practice at a slower speed until your hands find the guide without you glancing down.
- For a scant 1/4 inch in quilting, position your guide just a thread’s width inside true 1/4 inch. That tiny difference compensates for fabric consumed in pressing, which keeps pieced blocks from shrinking slightly over dozens of seams.
Pro Tip: Sew a 12-inch scrap strip, press it, then measure the finished width. If it’s off by even 1/16 inch, adjust your guide before you touch your project fabric. That small correction saves entire blocks or panels later.
What Do You Do With Seam Allowance After Sewing?
Once the seam is stitched, the seam allowance still needs work before the garment looks finished, and skipping this stage is where a lot of home-sewn pieces reveal themselves.
- Trim only when the seam allowance adds unwanted bulk. Open seams that stay visible on the inside, like those in a lined skirt, often don’t need trimming at all. Enclosed seams, such as collars, cuffs, and waistbands, need aggressive trimming so the seam doesn’t create a ridge you can see through the outer fabric.
- Clip curves that curve inward (concave), notch curves that curve outward (convex). A clipped concave curve, like a neckline, opens up so the seam lies flat when turned. A notched convex curve, like a curved hem, removes wedges of fabric so it doesn’t bunch.
- Grade layered seams by trimming each layer to a different width. On a seam with two or three layers of fabric plus interfacing, trim each layer slightly narrower than the one below it, staggering the widths so no single hard edge shows through on the right side.
- Press before you judge the result. Press seams open for most woven garments to reduce bulk, or press to one side for topstitched details and most knit construction. Pressing too early, before the seam is fully sewn, is a common beginner mistake that locks in puckers.
Which Seam Allowance Fits Your Project?
The right seam allowance depends on what the fabric needs to do, not on a single rule you memorize once and apply everywhere.
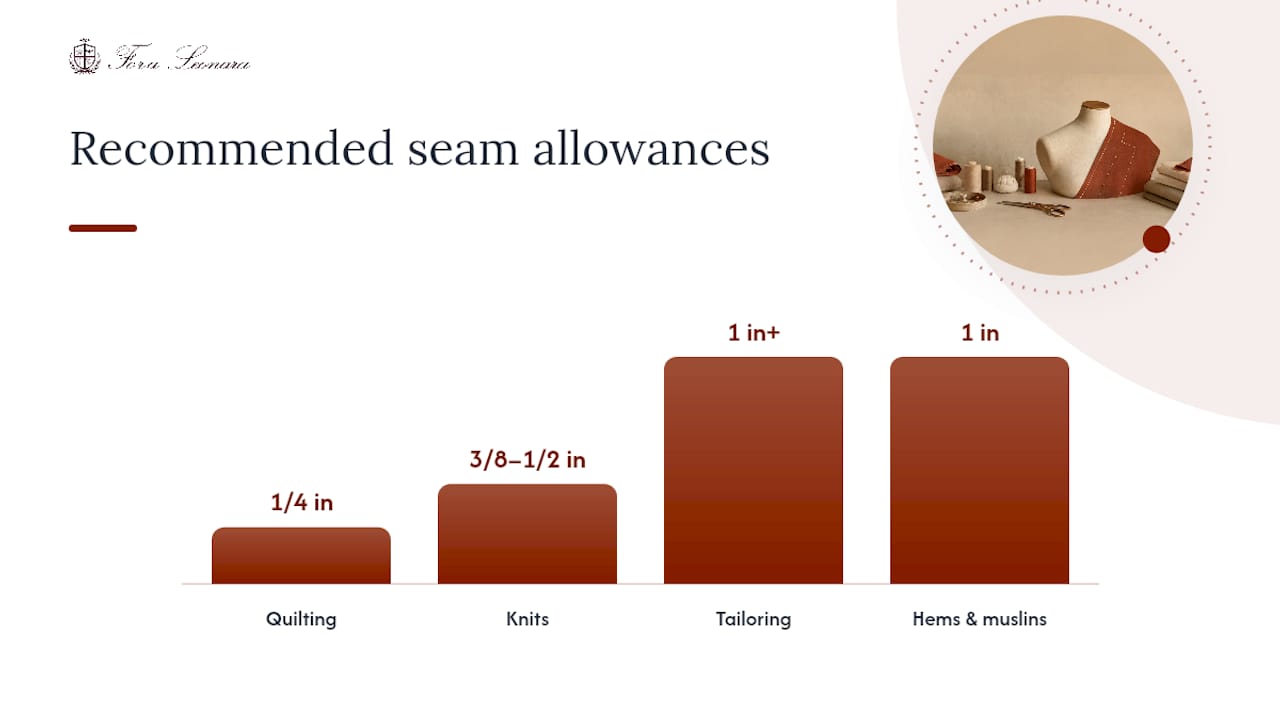
Quilting calls for that scant 1/4 inch discussed earlier, and it’s worth testing on a sample block before piecing an entire quilt top. Sew four 2 inch squares together, measure the result, and adjust your guide if the block comes up short.
Knits behave differently than woven fabric, since they stretch and don’t fray the same way. Many knit patterns call for 3/8 inch or 1/2 inch allowances, and if you’re serging your seams, the serger’s cutting blade trims as it stitches, so you need less allowance to begin with than a straight-stitch seam would.
Tailoring is where allowance turns into a fitting tool rather than just a construction margin. Larger allowances, sometimes 1 inch or more on side seams, give an atelier room to take a jacket in or let it out during fittings without recutting the whole panel.
Hems and muslins benefit from the most generous allowance of all. A muslin or toile built with 1 inch seam allowances lets you make major changes during fitting before you ever cut the final fabric, then trim down to a neater allowance once the fit is locked in.
The Atelier View: Why Fora Leonara Treats Seam Allowance as a Fitting Tool
At Fora Leonara, seam allowance isn’t an afterthought bolted onto a pattern. It’s part of how a jacket ends up sitting correctly on the shoulder or how a dress drapes the way it was designed to. Precise, consistent seam allowance preserves the structure a tailoring pattern was built around, and every deviation ripples into the finished silhouette.
Our fitting process starts with a muslin cut generously, often with a full inch or more of allowance on the seams likely to need adjustment. That extra fabric gets basted, fitted on the body, then pinned and marked before the final stitch line is ever cut close.
A garment’s final drape depends on decisions made at the seam line long before the last stitch goes in. Extra allowance during fitting isn’t waste. It’s the margin that lets a jacket become yours instead of just a size.
Pro Tip: If a fitting adjustment is small, a tailor will often shift the seam allowance rather than alter the pattern itself. Save pattern changes for structural issues, like a shoulder seam that’s fundamentally too long. You can see how these principles carry into finished construction in our guide to how a suit is made.
Common Seam Allowance Mistakes and How to Fix Them
Most seam allowance problems trace back to a handful of repeat offenders, and every one of them is fixable once you know what to look for.
Your seams keep drifting wider or narrower mid-line. This usually means your eyes are chasing the needle instead of watching the guide. Slow down, and focus on keeping the raw edge against the throat-plate marking or tape line rather than watching where the needle enters the fabric.
Your quilt blocks come out slightly smaller than expected. A true 1/4 inch, rather than a scant 1/4 inch, is often the culprit, since pressing consumes a thread’s width of fabric on each seam. Switch to a scant allowance and remeasure a test block.
Your finished garment feels tighter than the pattern size suggested. Check whether you cut a “net” pattern without adding seam allowance first. This single missed step shrinks every dimension of a garment.
Enclosed seams show a visible ridge from the outside. That’s almost always un-graded layers. Go back and trim each layer to a slightly different width so the bulk staggers instead of stacking.
Curved seams pucker instead of lying flat. Concave curves need clipping, convex curves need notching, and mixing up which technique goes where is one of the most common beginner errors on necklines and princess seams.
Sources
- How to Use Seam Allowance — The Spruce Crafts
- Seam allowance — Wikipedia
- Seam Allowance Guide: Standard Sizes For Every Project — Sewing With Ease
- What Is Seam Allowance in Sewing? — Sewing Machine Advice
FAQ
What is a 1/2 inch seam allowance used for?
A 1/2 inch (1.3 cm) allowance is common on some knit patterns and children’s clothing, balancing enough margin for stability with less bulk than the standard 5/8 inch.
What is a good amount of seam allowance for a beginner?
Stick with 5/8 inch for woven garments, since it matches most US commercial patterns and leaves room to correct fitting mistakes while you’re still learning.
What does 1 cm seam allowance mean?
A 1 centimeter allowance is close to 3/8 inch and appears often on European patterns for lightweight garments where minimizing bulk matters more than leaving room for alterations.
Is 1/4 inch seam allowance enough for garment sewing?
A 1/4 inch allowance works well for quilting piecework, but it’s usually too narrow for garment seams, which need more margin for durability and future fitting adjustments.
Recommended
- Proper Trouser Break Guide: Master Your Perfect Hem | Fora Leonara Journal
- The Art of the Hem: Mastering the Trouser Break | Fora Leonara Journal
- Perfect Suit Jacket Shoulder Fit: Essential Tailoring Tips | Fora Leonara Journal
- Perfect Trouser Break Guide for a Polished Professional Look | Fora Leonara Journal
