

The saddle stitch is a two-needle, hand-sewn technique that uses one length of waxed thread to lock every stitch independently, so a single broken stitch never unravels the seam. It’s the standard for wallets, belts, and other small leather goods that take daily stress. This guide walks you through the exact tools, measurements, and motion beginners need to sew a clean, durable line on their first try.
TL;DR:
- Using the correct chisel size and thread thickness ensures evenly spaced, strong stitches that won’t tear the leather under stress.
- Maintaining consistent tension with a two-pull rhythm and avoiding needle switching leads to neat, uniform seam appearance.
- Proper edge preparation, including beveling and burnishing, is vital before stitching to prevent fraying and improve overall durability.
- Wide leather layers require larger tools and wider stitch spacing to prevent tearing and ensure the seam can handle heavy use.
- Repairing flawed stitches involves careful unpicking and re-sewing, with attention to avoiding damage to the leather around the stitch holes.
Table of Contents
- What Tools Do You Need for Saddle Stitching Leather?
- How Do You Mark and Punch the Stitch Line?
- How Much Thread Do You Need and How Do You Attach It?
- What Is the Correct Saddle Stitch Sequence for Beginners?
- How Do You Finish and Trim a Saddle Stitch?
- What Stitch Spacing (SPI) Should You Use for Each Project?
- Why Do Saddle Stitches Come Out Uneven, and How Do You Fix It?
- What Leather Choice Means for Your Stitching
- How Do You Prepare Leather Edges Before Stitching?
- How Do You Keep Even Tension While Stitching?
- How Should You Adjust Technique for Different Leather Thicknesses?
- How Do You Fix or Redo a Bad Saddle Stitch?
- Which Threads Work Best for Saddle Stitching Leather?
- What Needle Type and Size Should You Use?
- An Alternative: Buy Expertly Finished Leather Goods Instead
- Sources
- FAQ
What Tools Do You Need for Saddle Stitching Leather?
You don’t need a workshop full of gear to start. A basic saddle stitching kit covers marking, punching, and sewing, and each piece earns its place:
- A groover or wing divider to mark the stitch line
- A diamond chisel (or pricking iron) to punch holes, in 3 mm, 4 mm, or 5 mm spacing
- A poly or rawhide mallet to strike the chisel
- Two blunt, rounded-eye harness needles
- Waxed thread (linen or polyester)
- A stitching pony or clamp to hold your work
- A stone, marble slab, or hardwood block to punch against
Chisel size determines your stitch spacing, and thread diameter needs to match it. A 4 mm chisel pairs with 0.45 to 0.6 mm thread, while a 3 mm chisel wants something closer to 0.3 to 0.4 mm. Harness needles have rounded, blunt tips instead of sharp points, since you’re threading them through pre-punched holes, not piercing new ones.
Pro Tip: If money’s tight, start with one 2-prong chisel and one 6-prong chisel instead of a full set. You can punch any stitch line length with those two, and add 4-prong or 8-prong irons once you know which projects you’ll be making most.
How Do You Mark and Punch the Stitch Line?
Your stitch line needs to sit far enough from the edge that the leather won’t tear under stress, but close enough that it looks intentional. The standard rule: set your line at 1.5 to 2 times the leather’s thickness from the edge. For 2 mm leather, that’s 3 to 4 mm in; for 4 mm leather, closer to 6 to 8 mm.
- Run a groover or wing divider along the edge to score a shallow channel, about 1 mm deep. This seats the thread below the surface so it doesn’t get scuffed or worn through with use, and Tandy Leather recommends this step specifically on exposed edges.
- Place the leather on a dense, non-bouncy surface. Never punch directly on a wood workbench.
- Strike your chisel with the mallet, then reposition by dropping the first prong into the last hole you just punched. This keeps spacing even across the whole line.
Pro Tip: Punch on marble, granite, or a solid hardwood cutting board, never a hollow bench top, since a soft or springy surface absorbs your mallet strike and gives you shallow, inconsistent holes.
How Much Thread Do You Need and How Do You Attach It?
Cut your thread to roughly four times the length of your stitch line. A 6-inch wallet seam needs roughly four times the length of thread as the seam, while longer seams like belts need proportionally more thread. Running short mid-seam means splicing, which weakens the stitch and shows.
- For waxed linen thread, attach each needle with a saddler’s lock: loop the thread back through itself twice and pull tight so it can’t slip off under tension.
- For polyester thread, a single loop through the needle eye is usually enough, since polyester doesn’t fray or slide the way linen can.
- Match thread thickness to your chisel spacing exactly. Thread that’s too thick bunches at the holes and distorts the leather; thread too thin leaves gaps and a weak, sloppy-looking seam.
What Is the Correct Saddle Stitch Sequence for Beginners?
Once your holes are punched and both needles are threaded, the actual stitching is repetitive and rhythmic, more like a drumbeat than a puzzle. Getting the sequence locked in your hands matters more than speed.
Clamp your leather into a stitching pony at a comfortable working height, angled slightly toward you. Center your thread through the first hole so equal lengths hang on both sides, front and back.
- Push the back needle through the current hole first, from back to front.
- Push the front needle through the same hole, from front to back, making sure it passes behind (not through) the thread already there.
- Pull both needles simultaneously to seat the stitch, then give a second, firmer pull to actually set the tension. That second pull is what locks the stitch in place, and it’s where most of your finished seam’s consistency comes from.
- Move to the next hole and repeat, always leading with the same needle.
The rule that trips up nearly every beginner: pick one needle, back or front, and lead with it on every single hole. Alternating your lead needle twists the stitches into a visibly uneven zigzag instead of the clean, diagonal “railroad track” look saddle stitching is known for. Count it out loud if you have to. Back, front, pull, pull. Back, front, pull, pull.
Check both faces of the leather every few stitches, not just the side facing you. A correctly sewn saddle stitch looks identical on the front and back, a straight diagonal line with no loops or skipped holes. If one side looks different from the other, stop and check your needle order before continuing.
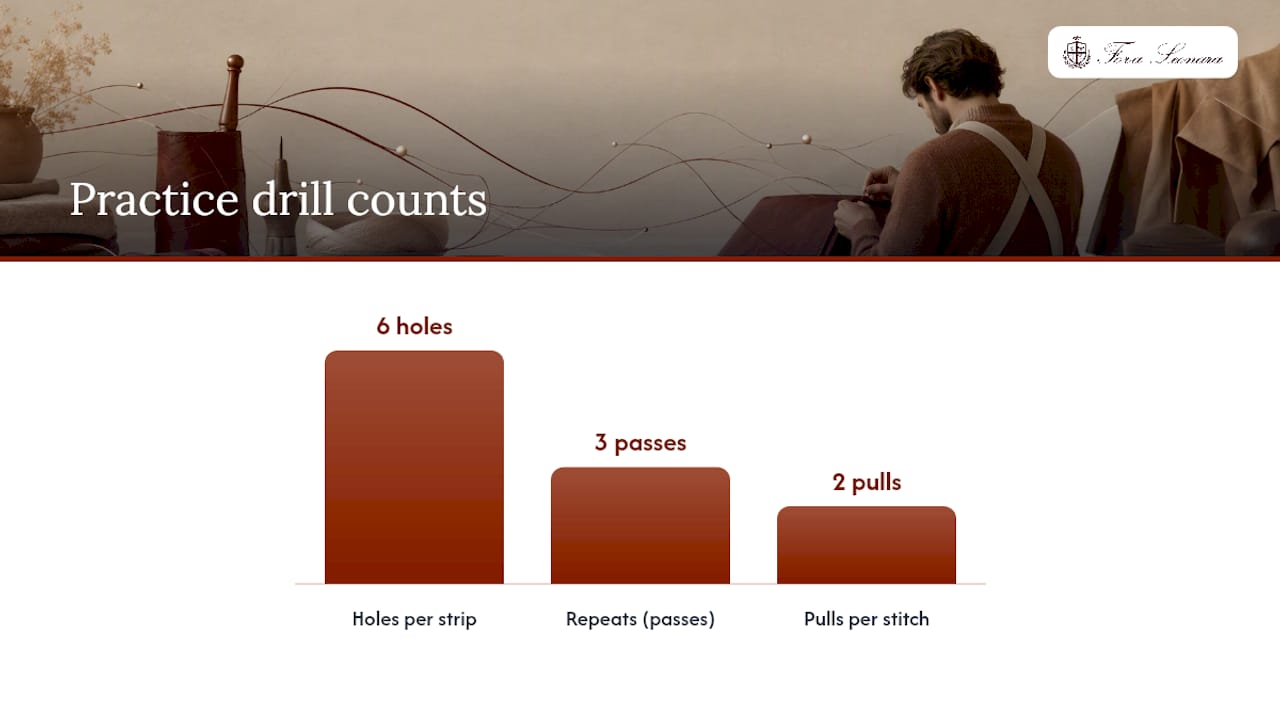
Before starting a real project, run this drill on a scrap strip: punch six holes, sew them, then pull the thread out and sew them again. Do this three times. By the third pass, your hands will find the rhythm without you thinking through each step, and that’s the point where you’re ready to sew something that matters.
How Do You Finish and Trim a Saddle Stitch?
Ending a seam correctly is what keeps it from unraveling the first time someone pulls on it. Skipping this step is the fastest way to ruin an otherwise clean stitch line.
- Backstitch through the last 2 to 3 holes before cutting your thread, doubling the stitch at the end for extra hold.
- For a completely hidden finish, run the tail into a pocket or seam void where it won’t show, common on wallet interiors.
- Trim both thread ends flush against the leather. For polyester thread, a quick touch with a lighter melts the tip into a small bead that won’t slip; for linen or hemp, a single drop of leather glue or beeswax does the same job without heat.
- Once trimmed, tamp the stitch line lightly with a smooth hammer or bone folder to flatten and polish the thread into the leather.
Pro Tip: Never trim your thread flush before you’ve backstitched. Cutting first and locking second is how beginners end up with a seam that starts unraveling within a week of use.
What Stitch Spacing (SPI) Should You Use for Each Project?
Stitches per inch, or SPI, is the measurement that determines both how strong and how refined your seam looks. Tighter spacing reads as more delicate and formal; wider spacing carries more load per stitch and suits heavier goods.
These figures come from established stitch spacing guidelines used across leathercraft. Lighter leather can handle tighter SPI because the load per stitch stays low; heavier leather needs wider spacing so each individual stitch carries less of the total stress across the seam.
Why Do Saddle Stitches Come Out Uneven, and How Do You Fix It?
Most stitching problems trace back to preparation, not the actual sewing motion. Fix the setup and the stitch usually falls into line.
- Twisted, zigzagging stitches: caused by alternating which needle leads. Commit to one needle order for the entire seam and don’t switch mid-project.
- Gaps or overlapping holes: happens when you don’t seat the chisel’s first prong into the previous hole before striking again. Always align before you swing the mallet.
- Loose or lumpy-looking stitches: usually a thread-to-chisel mismatch. If your thread looks thin against the holes, size up; if it’s bunching, size down.
- Inconsistent tension: comes from skipping the second pull. Practice the two-pull rhythm on scrap until it’s automatic before starting a real piece.
What Leather Choice Means for Your Stitching
The leather itself shapes how a saddle stitch performs over time, not just how it looks on day one. Vegetable-tanned hides, the material Fora Leonara favors for its small leather goods, hold their shape at the stitch holes rather than stretching or distorting under tension. A dense, evenly tanned hide reduces stress concentration at each punched hole, which is where seams typically fail first. Fora Leonara’s approach to sourcing and tanning leather reflects this priority, choosing stable hides specifically because they age and wear predictably. Regular conditioning keeps that same leather supple enough that the stitch holes never become a weak point.
How Do You Prepare Leather Edges Before Stitching?
Raw, unfinished edges next to a stitch line look unfinished no matter how clean your stitching is, and rough edges snag on clothing or wear down faster. Edge prep happens before you groove or punch anything.
Start with a beveler, either a hand-held edge beveler or a slicker, to round off the sharp 90-degree corner of the cut leather edge. This single step changes the entire feel of a finished piece, softening the edge so it doesn’t catch or crack. Run the beveler along both edges you’re about to stitch together, working in the direction of the grain and applying even pressure so you don’t gouge deeper on one pass than another.
After beveling, burnish the edge. Dampen it slightly, then rub with a wooden or canvas burnishing tool (or the smooth side of a bone folder) using firm, repeated strokes until the fibers compress and the edge takes on a smooth, slightly glossy finish. Some leatherworkers apply gum tragacanth or a beeswax finish before burnishing to help the fibers bind, particularly on veg-tanned leather, which burnishes better than chrome-tanned hides.
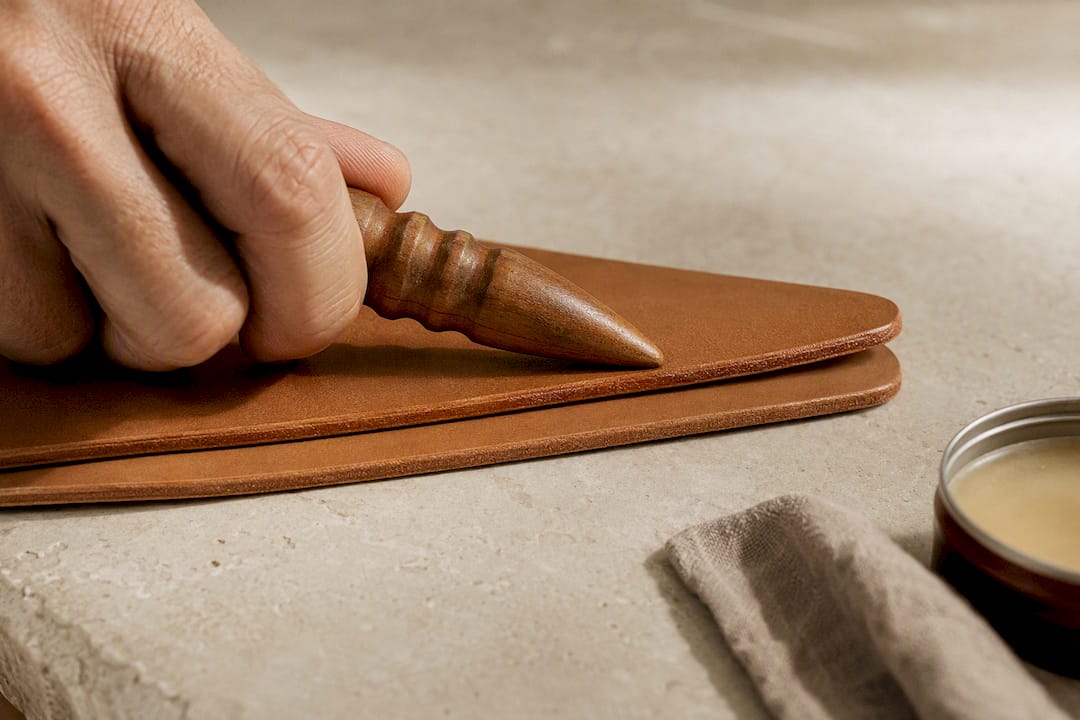
Do all of this before you groove your stitch line and punch holes. Beveling and burnishing after stitching risks nicking your thread with the beveler blade, and the compression from burnishing can distort holes that are already punched. The order matters: cut, bevel, burnish, groove, punch, sew.
How Do You Keep Even Tension While Stitching?
Uneven tension is the single most common reason a finished stitch line looks amateurish, even when the spacing and hole placement are flawless. The fix isn’t more strength. It’s rhythm and consistency.
The core habit is the second pull described earlier in the stitching sequence. Your first pull through each hole simply seats the needles and closes the gap; it’s the second, firmer pull that actually sets the stitch tight against the leather. Skip that second pull, or apply it inconsistently, and you’ll see slack loops on some stitches and tight ones on others along the same line.
Hold your working thread at a consistent angle, roughly 45 degrees away from the stitch line, as you pull. Pulling straight up tends to distort the hole; pulling too flat along the leather surface makes it harder to feel when the stitch has actually seated. Keep your hands at the same distance from the leather on every pull so the muscle memory stays identical from the first hole to the last.
Tension also depends on your seated position and how you clamp the work. A stitching pony holds the leather rigid, which frees both hands to pull evenly instead of one hand also fighting to keep the material still. If you’re working without a pony, brace the leather against your body or a table edge, but expect more tension variation as a result.
Test tension on a folded scrap of the same leather thickness you’re about to sew. If the stitches sit flush without puckering the leather or leaving visible slack, your tension is calibrated correctly for that particular hide.
How Should You Adjust Technique for Different Leather Thicknesses?
Thin leather, thick leather, and everything between all demand small adjustments to keep your saddle stitch clean.
On light leather, around 1 to 2 mm (2 to 3 ounces), the biggest risk is tearing at the stitch holes. Use a smaller chisel, keep your edge distance on the tighter end of the 1.5 to 2 times rule, and pull tension gently. Heavy pulling on thin hides distorts the holes into ovals instead of clean round punctures.
Mid-weight leather, 3 to 4 mm (4 to 6 ounces), is the most forgiving range and where most wallet and small goods projects sit. Standard tools and standard tension work without much modification.
Heavy leather, 5 mm and up (8 ounces or more), needs a bigger chisel, wider SPI, and considerably more mallet force to punch through cleanly in one strike. Don’t try to force a thin needle through thick material repeatedly. It’s worth switching to a slightly heavier needle gauge so it doesn’t bend under the increased resistance.
Layered leather, where you’re stitching through two or three pieces stacked together (a wallet card pocket over a body panel, for instance), behaves like leather thicker than any single layer. Measure your edge distance and chisel size against the combined stack thickness, not just the top piece, or your holes will be too close to the edge on the bottom layer.
How Do You Fix or Redo a Bad Saddle Stitch?
A flawed saddle stitch is almost always fixable if you catch it before the leather sees heavy wear. The repair method depends on how far the seam has already failed.
If you spot a mistake, twisted stitches, a skipped hole, uneven tension, while you’re still sewing, stop immediately. Back up two or three stitches, cut the thread at a hole (never mid-stitch), and re-thread from that point. Trying to “fix it later” almost never works once tension has already been set on the following holes.
For a seam that’s fully sewn but flawed, you’ll need to unpick it. Use a stitch unpicker or a sharp seam ripper to lift each stitch from one side, working backward from the last hole sewn toward the first. Pull slowly. Yanking the thread risks tearing the leather around the holes, which turns a simple redo into a repair job on the material itself.
If a single stitch has broken on a finished piece, you often don’t need to unpick the whole seam. Thread a new length through the two or three holes surrounding the break, tie it into a saddler’s lock on both ends, and trim flush. Because each saddle stitch locks independently, one broken stitch rarely spreads unless it’s left unrepaired for a long time.
For holes that have stretched or torn from repeated stress, the fix is more involved: you may need to re-groove a fresh stitch line slightly inside the damaged one and start over. This is the scenario where practicing tension control on scrap leather pays off, since torn holes are almost always a tension or hole-spacing problem rather than bad luck.
Which Threads Work Best for Saddle Stitching Leather?
Two thread types dominate hand-stitched leatherwork, and each suits a different priority.
Waxed linen thread is the traditional choice, prized for the way it grips leather fibers and holds a saddler’s lock without slipping. It produces a slightly textured, matte finish that many leatherworkers consider the classic hand-stitched look. Its downside: linen can fray with repeated pulling through tight chisel holes, and it requires that more involved loop-back lock to stay secure.
Waxed polyester thread (Ritza Tiger Thread is the most common brand among hobbyists) resists fraying, holds color well, and doesn’t degrade from UV exposure or moisture the way linen can over years of use. It’s also more forgiving for beginners, since a simple single loop through the needle eye holds securely. The tradeoff is a slightly glossier, more uniform look that some crafters find less traditional.
Hemp thread sits between the two, offering linen’s texture with somewhat better abrasion resistance, though it’s less widely available. Whichever you choose, buy pre-waxed thread rather than waxing your own unless you have a specific reason. Consistent wax coating matters more for smooth pulls than most beginners expect.
What Needle Type and Size Should You Use?
Saddle stitching calls for a specific needle style, and getting the size wrong causes more frustration than almost any other tool choice.
Harness needles, sometimes called saddler’s needles, have a blunt, rounded tip instead of a sharp point. Because you’re threading through holes already punched by your chisel, a sharp point isn’t just unnecessary, it actively risks piercing your thread or slipping past the intended hole into the leather itself. The eye sits at the tip rather than recessed, letting the needle pass smoothly through tight, pre-punched holes.
Needle sizing runs by number, and lower numbers mean thicker needles. A size 002 or 004 harness needle suits most medium-weight thread and standard 3 to 4 mm chisel spacing. Thinner thread and finer 3 mm work often calls for a smaller needle, closer to size 006. For heavy leather and thicker cord, a larger needle in the 000 to 001 range gives you enough shaft strength to push through firmly without bending.
Buy needles in pairs rather than singles, since saddle stitching always uses two identical needles on the same thread. Keep a spare pair on hand. Harness needles are inexpensive, and a bent or dulled tip mid-project is a common reason stitches suddenly start looking rough for no obvious reason.
An Alternative: Buy Expertly Finished Leather Goods Instead
Learning to saddle stitch well takes real practice, dozens of feet of scrap thread, and patience most people don’t have time for on a first attempt. If you’d rather skip the learning curve, Fora Leonara offers hand-finished small leather goods made from vegetable-tanned hides in its own European atelier, stitched to the same durability standards this guide walks through.

Every piece comes from the discipline of quiet luxury: no visible branding, no seasonal trend chasing, just leather chosen and stitched to last for years of daily use. If you want something bespoke, The Atelier offers personal styling consultations for readers who want a piece built to their own specifications rather than sewn by hand at a workbench. Browse the full product range to see what’s currently available, or reach out through The Atelier to start a bespoke inquiry.
Sources
- Leather stitching techniques are dominated by one stitch — the saddle stitch
- Stitching leather by hand: complete beginner-to-pro guide
- Tandy Skills: Saddle Stitching
FAQ
How Do You Saddle Stitch Leather by Hand?
Thread a needle on both ends of one waxed thread, then push the back needle through each punched hole first, followed by the front needle, pulling both tight with a second firm pull to set the tension before moving to the next hole.
What Is Saddle Stitching?
Saddle stitching is a hand-sewing technique using two needles and one thread, where each stitch locks independently through the leather so a single break won’t unravel the whole seam.
What Are the Disadvantages of Saddle Stitch?
It’s slower than machine stitching and demands more hand strength and practice to keep tension and spacing even, so early attempts often look uneven until a beginner has practiced the rhythm on scrap leather.
Is Saddle Stitching Better Than Perfect Binding?
Saddle stitching and perfect binding solve different problems: saddle stitch is a leathercraft sewing method built for strength and repairability, while perfect binding is a bookbinding technique, so they aren’t direct alternatives for leather goods construction.
